Nutating CA/CB Head Setup
An-102aa, Copyright © by Gil Hagiz
Last updated Mar-02-2006
For version 6.02 and later
Nu•ta•tion
1 : The act of nodding the head
2 : Oscillatory movement of the axis of a rotating body (as the earth)
(Merriam Webster Dictionary)
Introduction
This application note describes the setup of a nutating rotary head for 5-axis RTCP machining.
The topic covered here is the nutating head setup.
The RTCP capability is provided by a separate BIN file. Without this file the machine can work as a regular 5-axis non-TCP machine.
General
- A Dual rotary head can be set as either CA or CB with the same RTCP file.
The selection between CA and CB is done by entering C0 or C90 in line n13 of the CNX data (explained below).
- The head must be mounted accurately on the Z-axis. Removing and re-installing the head may require new setup.
- The standard positive rotation of a rotary tool (head) is CCW when looking from the positive direction of its perpendicular axis. This is the default of the TCP files.

However, in some existing machines CW direction is positive, so it can be set as desired.
- Note that A and B are virtual axes; the desired orientation is achieved by a combined motion of C-axis and n-axis (the nutator axis). Virtual C is the orientation of C (the tool) relative to the XY coordinates.
Preparation
This set up can be performed by a superuser only.
To avoid unintentional set up, the superuser has to change the security level in plc@50 to 0. In MDI type:
@50=0
Line numbers for setup data relate to the machine.cnx file, in the machine data area after line n30000.
Before you start:
- The file nca5.bin should be copied to the C:\RR directory (or wherever ncplus.exe is).
- The INI file must have the lines:
Axes=xyzca (or Axes=xyzcb)
Model=nca5
No directory or extension should be entered, the TCP file should be in the same dir as ncplus.exe.
Decide what positive direction you prefer for the rotary head (reverse the direction in the servo driver if needed).
If for one or both the positive is CW add /c /n switches to the command. For example:
Model=nca5 /c /n
At least one space should separate the switches from the file name.
Note: these switches are used for the TCP calculations, not for reversing the direction.
- C must be the 4th axis and A/B must be the 5th axis of NCPlus. If C or A/B are not the 4th and 5th axes of the Delta Tau use the DT mapping (see 6.02 upgrade).
For example, if DT's 4th axis is used for the spindle, enter in the INI file:
Axes=xyzca
dtsx=12356
- Use the latest ncplus.msg file (Oct-31-2005 or later).
- Cnx-101: add g100 in the motion line of Set-Home:
[101]
. . . .
menu
INCH Hand Wheel Jog
    0.0001
    0.001                       '
    0.01
\
  . . . .

  if (#110=@133) then
    @133=0
    g g100 @@+=#150*#110 g8
    mend
  end
END                                   \If mode=Set Home
- For limitless axis-C and symmetrical A/B:
- In plc-3 set
@64=$10 \Virtual 5th axis
This will force jogging A/B to call cnx-111.
- Replace cnx-111:
[111] Incremental Jog
if (key=@48&$07) then                   \key=4,2,1
  key=2-scan(key)                       \key=1,0,-1
  if @49==5 and @48<$100 then
    @@=key*45                           \use max virtual A/B
  else
    g100 @@+=key*#150
  end
  g1 f=4500/ki g9
end
mend
- For limited axis-C and/or non symmetrical A/B: C compensates for A/B motion therefore the target for jogging is not its mechanical limits.
The function pos(0) returns the amount of C compensation (delta C). If no TCP file exists, or a TCP file has nothing to report then pos(0) returns zero.
- In plc-3 set
@64=$18 \Virtual 4th and 5th axes
This will force jogging A/B and C to call cnx-111.
- Replace cnx-111:
[111] Incremental Jog
if (key=@48&$07) then                   \key=4,2,1
  key=2-scan(key)                       \key=1,0,-1
  if @48<$100 and @49>=4 then           \continuous
    if @49==4 then @@                   \4th axis, assume jog zero
      if key==1 then @@=pos(0)+270 end  \pos(0)= deltaC
      if key==-1 then @@=pos(0)-90 end
    end
    if @49==5 then @@                   \5th axis, assume jog zero
      if key==1 then @@45 end           \for non symmetrical A/B
      if key==-1 then @@-5 end
    end
  else
    g100 @@+=key*#150
  end
  g1 f=4500/ki g9
end
mend
- Comment out Cnx line n21, as all axes should move simultaneously upon G0:
\n21 z \g0 priority
- In plc-2 add display mode for TCP (plc@40 holds the TCP mode under H):
[2]
. . . .
@320=@399+10               \abs - distance
if @40>2 then if @399==0 then @320=9 end end
- Ensure that Home setting in plc-3 for both C and A is disabled:
[3]
. . . .
@74=$18
- In plc-4 add the command to use F5 for switching TCP-mode (H-mode):
[4]
    . . . .
    if @59<>0 then else
    . . . .
    end
    if @59==1 or @59==5 then              \Man, SetRef
      if @88==1063 then kb(1194) end      \F5 switches H-mode
    end
  end
end
- In plc-9 add the display mode TCP Abs:
[9]
 . . . .
 9\TCP Abs  \
10\Absolute \
11\Dis To Go\
- Ensure that Cnx line n13 reads:
For CA: n13 x y z c a=sin(Nu)
For CB: n13 x y z c90 b=sin(Nu)
where Nu is the nutator angle (half of the max virtual A/B).
Note: all 5 axes must be entered in line n13.
- If C has no limits and is free to rotate indefinitely enter C in line n19 (with S):
n19 S... C1
- If C has limits: See C setup instructions later.
- All axes must be able to move freely, after the servo drivers have been set.
- All axes must have their Reference procedure working, all references set, and table limits set.
- A dial indicator (or test indicator) is required for squareness and similar measurements.
- A calibration ball tool with a known radius/length will make the calibration a lot easier.
- All motions are done in H0 mode, unless otherwise written.
Setup general
- We are going to set the machine zero for axes C and A/B.
- For a rotary head, the machine zero for XYZ is not critical.
- While setting the reference, machine zero is set at the reference marker; however, for this setup we need a specific accurate zero for C and A/B. Rather than moving the marker and sensors we let the computer set the zero where we want it.
To set the machine zero for an axis proceed as follows (C is used as an example):
- Set the reference
- Jog C-axis to the desired zero
- Select Set-Home mode
- Select machine zero: press alt-0
- Open the MDI-like line by pressing <Enter>
- Type the axis letter C and press <Enter>
- If you are not at zero but say at C15 type:
c15 <Enter>
- The zero for C becomes effective immediately
Notes:
- Same procedure is used for setting the limits; press alt-p for setting the positive limit and alt-n for the negative limit.
Note that you always enter your position relative to the limit, which is zero if you are at the limit.
- In SetRef mode (and ChkRef) the display shows the distance of each axis from its electronic reference.
- In all other modes the display shows the distance from the current Home.
- For CA or CB heads, Home setting (fixture offset) for C and A/B is disabled.
- Home #0 is the machine zero.
Setup A/B-Axis
A/B=0 is when the tool is vertical, in the minus-Z direction, same as in a three-axis machine.
For CA, A=+max is when C=0 and A is in the direction of plus-Y.
For CB, B=+max is when C=0 and B is in the direction of minus-X.
To set A/B proceed as follows:
- Reference A/B.
- Set the positive and negative limits.
- Set A/B to vertical with the jog pushbuttons.
- Use an indicator; move Z up and down and move A/B until it is in line with Z.
Try different C-orientations: if the result changes, C does not turn exactly about Z.
The control cannot compensate this error.
- With A/B vertical, enter in Set-Home for offset #0:
a <Enter>
or
b <Enter>
Setup C-Axis
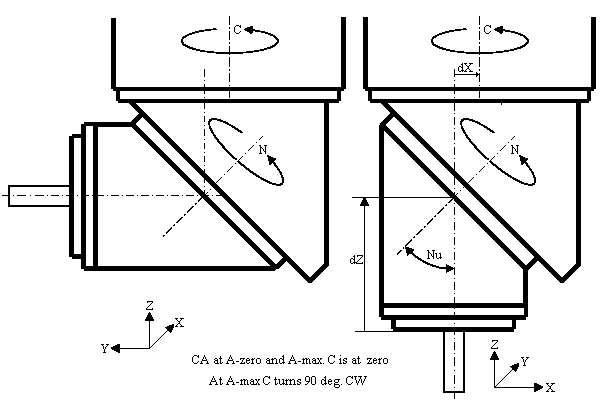
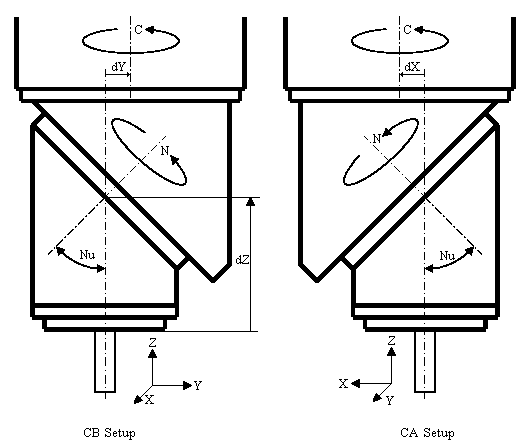
C=0 is when positioned as in the left picture for CB and the right for CA.

This setup can be used if the nutator range is at least 0 to 180 degrees, and C is limit-less.
With this setup, A/B moves in the same direction as the nutator axis and complies with the standard directions for rotary axes.
Note how the orientation is defined relative to the XYZ axes.
If C has a limit:
In modes other than H0, C turns 90 deg CW when the nutator moves from 0 to 180 degrees in order to keep the virtual-C orientation of the tool constant.
If the head is oriented as shown above for C-zero and the limit is at 90 or 180 degrees, (depending on whether the head is set as CA or CB) this setup leaves enough room for a convenient use of the head.
However, if at this orientation the limit is at about -90 or 0 degrees then only one setting of CA or CB will let the C to move the +90 degrees when A/B moves from zero to max.
With this setting, either at A/B-zero or A/B-max C will be at the limit.
If it is desired to move the zero away from the limit, the zero position for C can be set 180 degrees off (mirror image of the pictures above). But now, what used to be positive direction of A/B is negative.
The solution is to reverse the direction of the nutator and to call the TCP file nca5 with the command line switch /n.
In addition, the nutator limits should be reversed (positive= 0, negative= -180).
Note that using negative A/B is somewhat confusing but still complies with the standard directions for rotary axes.
To set C proceed as follows:
- Reference C.
- Set the positive and negative limits.
- Jog or use MDI to set the nutator axis to +180 degrees.
- Set C as close to zero as you can.
- Use an indicator.
For CA: move Y to plus and minus and adjust C until A is in line with X.
For CB: move X to plus and minus and adjust C until B is in line with Y.
- When C is set enter in Set-Home for offset #0:
c <Enter>
Offsets
X and Y offsets compensate for misalignment between the spindle axis and the C-axis.
XY offsets are measured from the spindle to the center of C-axis.
For example, if offset x1 is entered then the machine will be at x1 when the tool is at x0.
Note that C-zero refers to the mechanical C and not the virtual C.
X-offset
- Set both C and A/B to zero.
- Set an indicator on the spindle in the plus-X direction.
- Turn C exactly 180 deg. (use MDI)
- Write down the error divided by TWO. The sign of the error is negative if it is in the plus-X direction (C-center is negative relative to the spindle).
- Enter the result in line n13 for X.
Y-offset
- Set the indicator in the Y direction and repeat the same sequence as for X.
- Enter the result in line n13 for Y.
Tool Length
Tool length is measured from A/B-pivot, however, tools can be measured from a more convenient place, like the spindle face.
To measure the Z-pivot length:
- Use a calibration ball tool with a known length.
- For CA:
- Set A to vertical and set the indicator to touch it at its +Y direction. Write down the Y-position.
- Set A to +90 degrees and move Y until it touches the indicator again. The difference between the Y readings is the pivot length.
- For CB:
- Set B to vertical and set the indicator to touch it at its -X direction. Write down the X-position.
- Set B to +90 degrees and move X until it touches the indicator again. The difference between the X readings is the pivot length.
- If A/B cannot reach 90 degrees set it to 30 degrees. The difference between the Y/X readings is one half of the pivot length.
- Z-pivot length to the spindle face is the length measured minus the ball tool length. Enter the calculated length under Z in line n13.
n13 x.002 y-.004 z243.12 c
Final test
- Recompile the CNX file.
- Test C and A/B for Set Reference and jogging limits.
- Set TCP mode (H2).
- While moving A/B in H2 mode the tool should not change its azimuth (virtual C). The mechanical axis-C moves to compensate the motion of A/B.
- Check that +A is in the plus Y direction and +B is in the minus X direction.
- Test C and A/B in H2 mode for their virtual limits.
- Set TCP mode (H5).
- Repeat the offset test in TCP mode (use jog or g1 in MDI).
There shouldn't be any offset errors.
- Use a calibration ball tool with its length set in the tool table.
- Set 2-3 indicators touching the ball.
- While moving C and/or A/B in TCP mode the indicators should stay stable.
- Set C and A/B to non-zero positions.
- Check that the jogging and handwheel move the axes as if you were sitting on the tool (-Z is forward).
- Check that the drilling canned cycles work in the tool direction.
