In the early days of NC all motions were incremental.
The operator had to bring the tool manually to the starting position and then the program moved incrementally from point to point. At the end the program returned to the starting position so the operator didn't have to set it again and again, unless he pressed Reset in the middle…
Of course if you changed one line of code the rest of the program was affected with that change and ensuring that the program ends at the starting point was quite time consuming.
That paved the road for absolute programming.
Absolute programming requires that the control will be synchronized with the machine.
A simple way was to move the tool to the starting position of a part program, as before, and tell the control what are the coordinates of this position. This is still done today with G92.
A typical g92 appears in the beginning of a program as:
G92 x_ y_ z_From there the program could move in both absolute and incremental commands, for which g90/g91 were added.
So the next step was to bring the tool to the starting point and set is as zero manually. If the program was stopped in the middle the zero position was still effective and the program could be re-started without re-position.
That was okay until the power was turned off and the zero set point was lost.
To synchronize the machine with the control accurately and repeatedly the Reference was invented. The reference is a single position for each axis that the measuring system can identify. After the machine is turned on all axes are referenced by a built-in cycle.
The reference then becomes the machine zero, and all absolute dimensions are measured from this zero.
But if the part program assumes that the zero is in the center of the part we would like to have the machine zero where the part is and not where the reference is.
We can still use G92 but with the same limitations as before.
So we need both a reference and a settable zero. Even if the zero is lost upon power off it can be restore if its distance from the reference is known.
With the advent of CNC the zero could be saved in memory and restored automatically upon power on.
So why only one zero?
If we cut the same part on different fixtures we need a zero for each fixture.
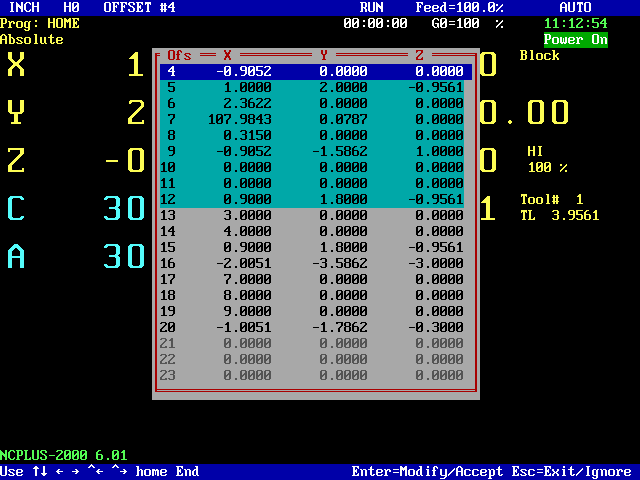
Today's controls usually have at least 6 fixture offsets, denoted as g54 to g59.
G53 is the machine zero and is used for moving the axes to fixed positions relative to the machine, not the part, such as tool-change or pallet change position.
G53 is not intended for cutting but for moving relative to the machine, for instance sending Z up before M6, or doing leadscrew calibration.
For simple 3-axis machines the machine zero can be the reference, but since the exact location of the reference depends upon the measuring system we need an independent position to be the machine zero, at least to make Z position machine-dependent.
For 5-axis machine setting an accurate machine zero is a must. For rotary tables at least XYZ and the 4th axis need accurate machine zero, and for rotary head the head axes need machine zero.
G52 is called local coordinates or zero shift or floating zero.
When an offset has a known distance from the current zero it is naturally set in the program. There is nothing to measure on the machine. This could be used for repeating the same pattern on same part or when using fixture offsets that are machined as one piece. This is especially useful if the program can loop.
Some people confuse G52 with G92. G52 is just shift of the zero point. It sets the programmed position as a new zero, regardless of the machine position and the displayed position doesn't change.
G92 X1 sets current X to 1 and therefore the machine must be located at a known position before calling it. The display will show X1.
In both g52 and g92, axes that are not programmed do not change.
The idea of fixture offsets is that you set them manually, by edge-finder or other techniques.
Like tool compensation, the job is split between the programmer and the machinist who does the setup.
That's the most productive way to use CNC machines.
NCPlus uses 15 offsets as follows:
-2	Negative limit
-1	Positive limit
 0	G53 machine zero
 1	Last position reached by a program (for jog and return)
 2	Current G92
 3	G+53 (for internal second machine zero)
 4 – 9  g54 to g59
10 -12  g59.1 to g59.3
Offsets -2,-1, 0 are relative to the reference, all other offsets are relative to the machine zero.
Offsets can be manually selected from the keyboard:
-2, -1	  alt-n,  alt-p
 0 to 9	  alt-0 to alt-9
10 to 12  alt-A to alt-C
When a program starts G54 is the default.
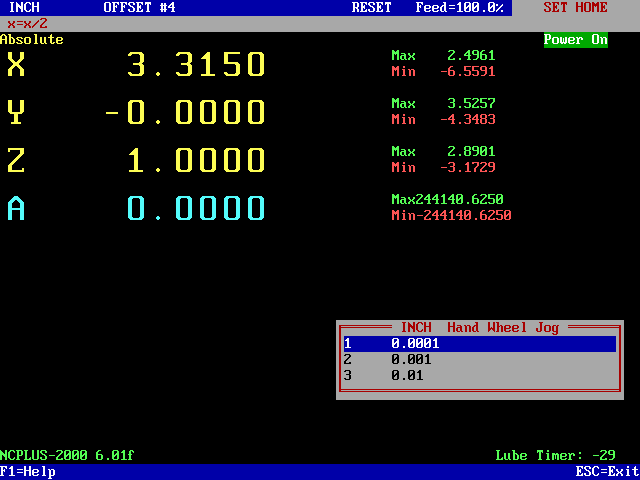
NCPlus lets the operator set each axis independently, in case that the tool cannot reach the desired position, and the desired position is not necessarily zero.
The setup works like g92 – the tool is jogged or moved by MPG to the desired position and its desired coordinate is entered.
To set Home #5 (G55) proceed as follows:
|
|
To read an offset by a program use the home function, which takes an offset number and an axis number:
#1=home(4,1) \offset of X in G54To set an offset from a program (similar to Fanuc's G10 L2...), for example to set G55 to x1 y2 z3:
g92 g55 x1 y2 z3To set XY of offset #5 relative to offset #4:
g92 g55 x=home(4,1)+1 y=home(4,2)+2
Both regular and extended offsets (see below) can be viewed and modified with a CNC utility.
|
|
Setting offsets in a program gives the same results as G52. The only difference is that with G52 the position display shows the distance from current offset and not the shifted zero. However, G52 is faster.
G52 can be used in a few ways (don't even think of using g91):
G52 X_ Y_ Z_  \set the zero relative to current offset (absolute)
G+52 X_ Y_    \set the zero relative to current zero (incremental)
G52 X+ Y+     \set the zero at current position
G52           \cancel zero shift
Note that axes that are not written do not change.
NCPlus is usually set to have tool length compensation active at all times.
The advantage is that the Z-display shows the tool tip position rather than the machine position.
Note: when machine zero is selected (home #0) tool length is ignored.
If all tools are calibrated, after setting the Z-offset with one tool it will be set for all tools.
If the Z-offset was set with a calibrated tool then all other tools can be calibrated by touching any known Z with this offset.
When a tool tip is at z-zero the machine position (relative to the machine zero) is the sum of tool length and z-offset.
If you set the z-zero with random tool length you can have sum of zero from tool length of 1" and z-offset -1", but the same sum is also the result of tool length of 100" and z-offset -100". These numbers don't affect the machine at all but they look strange when you look at the tool table or the offset table.
So the best way is to set the first z-offset with a calibrated tool and unless you measure the tools in a tool room you can calibrate them on the machine with the already set z-offset.
Notes:
For controls with small number of offsets there are a few tricks to add offsets, but all of them are based on programmed values and not setup by the operator.
NCPlus uses 9 standard offsets g54 to g59.3 (4 to 12) but the number of true settable offsets can be seamlessly extended beyond #12 (g59.3), up to 99.
This requires adding code to the cnx file by the installer/retrofitter.
The extended offsets can be set up same as the good old ones, as many times as desired.
When an extended offset is called it is copied into offset 12 and actually this offset is active, but the extended offsets number is displayed as the OFFSET # at the top line.
There is an additional offset table called home.bin. This table can only be filled sequentially w/o holes.
You can modify existing offsets but you cannot set a new offset and leave a few undefined ones in between.
To set an offset, in Set-Home mode select offset 12 (alt-C) and use the right/left arrow keys to increase or decrease the offset number. The highest possible offset number is the first undefined one (or 99).
In a user program an extended offset is called by:
G54.1 O_
Where O is 13 to 99
If O is less than 13 g54 is resumed.